|
Pilot's cockpit
The kit's version is very simple. Eduard's cockpit detail set is a
substantial improvement over kit's version. Instruction manual for
the "metalwork" is quite comprehensive; if you follow it carefully, the
assembly is relatively straight forward. You need a lot of patience when
attaching the seat belts, because some components are really tiny; you can
easily lose them. The manual is very clear about the camouflage coloring
details and the cockpit interior. You can also use numerous photographs
from the 4+ series as a helpful reference. I painted the interior with
synthetic Agama paints.
Fuselage:
Academy designed the model's fuselage as a ten piece puzzle. Your modeling
skills will be severely tested, especially when fitting the front fuselage
with the centerpiece. I wasn't quite successful; that's why I had to
follow with lots of tedious filling, sanding, and panel lines rescribing.
After the short delay, I glued the main landing gear components into the
fuselage. I also enhanced the original landing gear bay with parts No. 8,
40, 43 from the Eduard detail set 48429. Then I prepared the engine's
intake channels. I recommend leaving them shut, because the manufacturer
neglected to design their interior detailing. I closed the intakes opening
with piece No. 38 from the detail set. The transition between wing and
fuselage needs filling and new panel lining. Before fitting the wing halves
you need to drill holes for weapon pylons on their bottom surface [only if
you want it to carry weapons, of course]. Glue these modified wings into
the fuselage and cement both vertical stabilizers and infrared decoy
flares for the heat-seeking missiles on the top of fuselage. I corrected
small seam imperfections with a bit of filling and sanding. The detail set
No. 48429 includes a variety of covers, screens and aerials. Too bad the
details on the bottom of fuselage are completely hidden behind an external
fuel tank. After appending the above mentioned details, I sprayed the
entire fuselage with Surfacer.
Engines:
Eduard did a great job with their designing. PE exhausts look very
realistic and they are easy to assemble. However, do not glue them onto
the fuselage yet! You need to spray on the camouflage first.
Weapon pylons, flaps and landing gears:
I attached missile rails to the pylons; they were ready for painting. I
could easily fit the PE parts on flaps, but I had some problems with
landing gears. Particularly the front landing gear leg required a lot of
patience. The bending of a PE fender was quite arduous, as well as the
gluing of hydraulic systems onto the legs of the main landing gear. But
the result was well worth it! The PE parts really jazzed up the landing
gear.
External tank:
The external fuel tank was complemented with two parts from the 48429
set - an exhaust pipe from APU and a perforated rear cover. The usage of
these accessories was trouble-free.
Canopy:
I used parts from the 48423 interior set, such as rear-view mirrors, rear
partition and ventilation shafts. There were again no problems with
fitting these components.
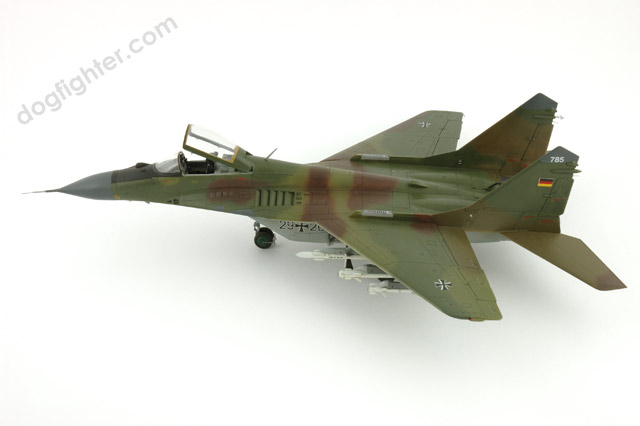
When you have finished the "construction work", you can carry on by
applying camouflage. I began by spraying the panel lining on the engine
cover. Here I used Humbrol - glossy steal. After polishing and masking,
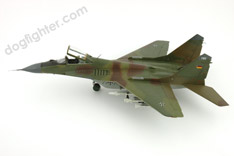
start painting the camouflage pattern. We have a choice between a Russian
and West German [literally] versions. I opted for the German model. Its
camouflage is more complex and colorful, but also more laborious. First
I sprayed the bottom surface with light grey. When dry, I used dark grey
on the radar covers and radios. I masked again and then proceeded with
camouflage, which comprised of four color tones - brown, field green,
olive and dark green. The kit manufacturer uses color classification in
compliance with the FS sampler. I sprayed my model with Agama colors
[R17P, R14M, A47M and R13M]. When spraying the canopy part, I used a
very helpful set of masks Eduard XF 102, which even included a mask for
wheel rims - again, a very practical tool.
To sum up, the construction of MiG-29 is enjoyable and trouble-free, and I
highly recommend both the kit and the above mentioned PE detail sets.
|