|
Aircraft models in 1:24 scale are not a novelty to our market, but until
recently there have only been grossly "outdated" kits, which were both
pricey and of poor quality. Perhaps that explains the small number of our
model builders, who would now devote much of their time to 1:24 scale.
The Chinese Trumpeter certainly brings new excitement into this category
of plastic models; as my first attempt at this series I decided to test
the legendary Spitfire Mk. V
Preconditions:
I had two complete kits at my disposal, which presumably allowed me
greater objectivity in evaluating their true quality.
I mainly used Humbrol glue and Tamiya filler, some joints were done with
the help of superglue. Transparent parts were glued with Herkules
dispersant glue.
The basis for my model was Tamiya filler [spray] and silver Tamiya
enamel in spray. I painted the camouflage with synthetic Agama colors,
which allow for more weathering techniques possibilities.
I applied decals using the GS softening solution.
Kit:
The box cover is certainly not one of the most attractive, just like the
other Trumpeter covers from this era. On the other hand, I must give
credit for the cardboard material, which is very sturdy, thus perfectly
protecting the kit's components: i.e. 233 grey plastic parts, 6 of
transparent plastic, metal parts set [for the attachment of control
surfaces], rubber parts [wiring, tires], and a sheet of photographic
film representing the instrument panel dials.
The quality of plastic components is quite good, but definitely not
adequate for the scale of the model and its recommended retail price. I
was immediately baffled by the riveting represented by thousands of
"holes" covering the entire fuselage surface. Another shock came when I
noticed that the component's surface was "covered with canvas", and since
they were molded under production of Trumpeter, the ejector pin marks were
bound to be found everywhere.
The transparent plastic parts, i.e. transparent canopy components, are a
different story - although they are not very detailed, their thickness
puts them into the category of high quality 1:48 models. Unfortunately,
the instrument panel body is made from a "different sort" of transparent
material: the manufacturer apparently assumed that the Spitfire was using
armor plating from the captured "koenigs tigers" - so amazingly thick is
the panel. The side engine covers are also made of the transparent
plastic, but I'd be very surprised, if our model builders could find some
use for this "see-through" version.
My smallest complaint concerns the rubber components, i.e. the pieces
forming wiring, engine hydraulics and the 3 landing gear wheels. They all
look quite realistic, they are also very "elastic", but the tires are
"without tread" and other details desirable for such scale [producer,
size...].
Trumpeter found an interesting solution for the attachment of all movable
control surfaces. These parts are "suspended" on small hinges, thus
really "movable".
The graphic design of decals displays perhaps the lowest quality out of the
entire kit. Not only does the producer offer only one marking scheme -
"RF-K[rysia]" - which wouldn't be a major problem, but the number of
blunders and measurement errors in this case is unheard of [what is more,
I am talking about a marking, which has been well documented on high
quality full-color photographs!].
Detail sets:
As you can guess from reading the description above, to give my model a
decent look I had to use an alternative decal set from a Polish producer
Extratech [presently offering two sets]. Furthermore, I had to invest
into the "Chinese version" of the interior [see below] and had to exchange
the "old" propeller type - both parts can be easily replaced with the aged
components from AIRFIX [if you have the opportunity]. At the time of my
construction I couldn't find any other available accessories on our market.
Shape precision:
I didn't try to examine the shape precision of main components in the hope
that in such scale potential "millimeter" variances could not have a big
impact on the final appearance of my model.
The more I focused on assessing the interior dimensions - I immediately
noticed that the pilot's seat reassembled the seat from the airport
latrine; also the size and location of other cockpit details didn't match
the available photo documentation.
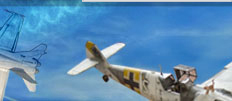
I have already suggested that the use of the kit's default propeller and
spinner is disputable. The manufacturer's type was used mainly in the
older Spitfires; although some documentation shows that the propeller was
mounted even on the aircraft version Mk. Vb, on all photographs I could
find the planes with "RF-K" marking already carried the new propeller
version.
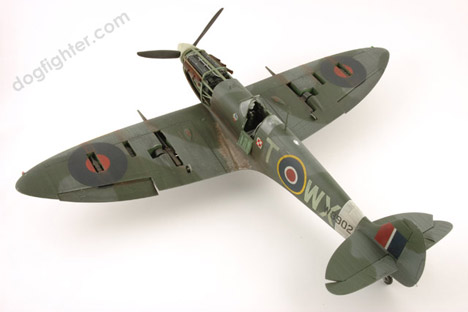
Equipment and weaponry:
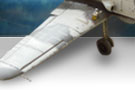
The kit allows "unpaneling" - the panels covering all weapons installed
in the wing are revmovable (see wing photos below). Another option is to
"display" the engine behind the transparent side panels [I am, of course,
quite skeptical about this option], or you can leave the engine uncovered
[i.e. without the side and top panels]. In the case of my test model I
made a compromise - with the right panel firmly adhered, I took the left
and top panels away [the photos illustrate the final stage of my "straight
from the box" build - Spitfire experts will surely discover numerous flaws
and missing details].
Assembly:
All components fit almost perfectly and they are adequately flexible. The
kit's creators designed a very smart joint scheme for almost all parts,
with the exception of the front cockpit panel [no indication of a joint
line] and the "movable" landing flaps [the inner details are missing and
Spitfire experts can, once again, find many factual errors].
"Loosening up" of the aforementioned movable parts on a static model poses
a small technical challenge. The straight from the box build has
unnaturally big gaps in the joints, movable parts spoil the wing profile
[they stick out], not mentioning the valid laws of gravity; it is thus
quite difficult to set all the movable parts in their desired position.
The trailing edge is highly unrealistic and abnormally thick. To
demonstrate the result on my test model, I let the edge practically
unmodified, i.e. without sanding [however, even a less experienced model
builder should fix this problem].
Preparations:
Before the construction, you need to decide whether you want to struggle
with the problems described above or whether you want to build the model
just for fun. In the first case, you need to acquire at least the new
pilot's seat, and if you chose the manufacturer's camouflage scheme, you
will also need the new propeller; if you purchase extra decal sets from
the Polish Extratech, then you can use the "old" propeller.
Next step is to reduce the width of all joints constituting the trailing
edges. I recommend that you make a "dry" test assembly of the entire
fuselage using masking tapes [or yellow Tamiya tapes]. This way you can
get a general idea about the upcoming construction, so that you can
optimally plan your build procedures [e.g. before joining the centerline
with the fuselage you must complete the cockpit's interior and glue the
main wing components first, i.e. the top and bottom parts, together with
gluing in the movable wing components].
Build process:
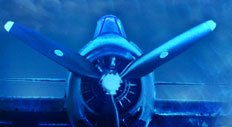
I started off my model with the engine assembly, then sprayed it and
painted an adequate weathering scheme [according to available literature].
While I was "reviving" the engine, I was also assembling, painting and
applying weathering to individual cockpit components.
Faithful to the build progression in the manual, I then assembled the
fuselage, putting the engine inside a "cage" - nevertheless, I would
suggest a different order. First, I would "cut off" the cage locking the
engine inside the fuselage, then join the fuselage halves together, insert
the cockpit from the bottom, and leave the engine for the very end, after
the fuselage has been painted with camouflage and weathering.
While I was assembling the fuselage, I was also putting the various wing
components together: I assembled the weapon systems, prepared the bays
for their installation, then assembled the movable wing parts by gluing
the hinges, and finally connecting the various components to form the
wing. I was pleasantly surprised with the result. The main fuselage
components fitted nicely together and the entire "construction" looked
quite solid, and compact, contrary to my bad experience with some other
models in 1:32 scale - e.g. Revell's "Lightning". The last step was to
add the horizontal stabilizers and "center" the geometry.
When all of the main joints were ready, I started with gap-filling. As
usual, I chose the time-tested Tamiya filler in spray form. After
carefully sanding the repaired joints, I let the result "ripen" for couple
of weeks. I almost always use the Tamiya filler [spray, "FINE"] as the
base layer; in this case, however, I used two layers: first coat /
filling / second coat / "wet" sanding with 1500 grit.
After several days of "hardening and drying" and after another wet
sanding with 1500 grit, I assembled the fuselage with dispersion glue as
much as possible, whereas the weapon covers on the wings held well enough
even without any adhesive. I then prepared the model for another layer
using a silver spray - Tamiya enamel TS22, recommended for large
fuselages.
While my "Silver Spitfire" was drying in a waiting room for couple of
weeks, I used this spare time for assembling smaller components like
landing gear, propellers etc. Several weeks after the "silvering", I
re-polished the entire fuselage in running water with a very fine
sandpaper plus Tamiya finishing compounds; after drying thoroughly, I
followed with camouflage painting [see below] and weathering. I
complemented the nearly finished model with pre-assembled landing gears,
propeller and few other details - you can judge the result for yourself.
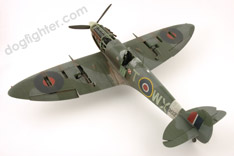
Painting:
The guide to my painting scheme was a model with "RF-T" marking - the
Extratech version. Although there are some references in technical
literature to the "old" propeller being used with this specific model,
my assembly assignment required the "new" propeller; you can thus compare
the different appearance of both versions by looking at the finished
model.
Before spraying on the camouflage, the fuselage received its "third" coat
of paint - a light great camouflage color. After two days of drying, I
carefully masked the lower fuselage components and sprayed on a dark grey
color on the top surfaces; after another 48 hours, I prepared the masking
using "an oil-free modeling clay" for spraying on a dark green color. When
dry, I removed the masking from the entire fuselage and let the colors
"ripen" in a waiting room.
Here I must draw your attention to a peculiar quality of "green Agama
Colorstop", which after several days of "drying" changed its
characteristics from a colorstop to a high quality "base color". I thus
had to apply Tamiya finishing compounds [fortunately, they disposed of the
colorstop]. With these compounds I also polished the entire fuselage. In
accordance with available photographs, I tried to realistically "wear
down" the aircraft's strained areas to bare metal with sandpaper 600, 1500
and a scalpel. Then I sprayed the whole set with two layers of synthetic
Humbrol enamel [warning: based on my bad experience from the past, do not
use acrylic enamels on a synthetic surface!] and after 24 hours, when the
enamel layer was still pliable enough, I started applying decals.
Decals:
The manufacturer's decal sheet allows for only one marking -
"RF-K[rysia]". Alternatively, you may use one of the available Extratech
sets.
In both cases, the decal quality was very good, which shouldn't be
surprising for a 1:24 scale model.
The kit's decals are glossy, those from Extratech are rather semi-matt.
Having the glossy enamel in the "base", the decals' adhesive power was
excellent, the kit's decals were even slightly better. The decal's
"fragility" posed a small problem [especially those from Extratech]: for
example, I couldn't "stretch" the royal emblem on the wing's bottom over
the bumps on the panel.
With regard to the decals' size, I definitely recommend an application of
a softening solution. In my case, I successfully used a GS solution - I
suggest the following procedure:
- Dip the decal in warm water for about 5 seconds and place it on
newspapers until the twisted base paper straightens out.
- "Wash" the decal's contact area with a softening solution.
- Slide the decal carefully into its position, let it react for about 30
seconds and then dry it with an absorbing cloth. Apply solution so that
it soaks under the decal, and immediately dry it out again.
- Wait for about one minute, then apply solution one more time and let it
dry out and harden completely without intervening [even though the decal's
surface won't be "corroded", as is common with some other decal sets,
there is still a danger of "tearing" the softened decal by rough
handling!
- If, despite the previous steps, there are still some trapped "air
bubbles" under the decal, then you have to apply solution one more time
and let it dry again. The second "application" usually fix the decal
perfectly.
After following the procedure above, you should be happy with the result.
Nevertheless, to the experienced model builders I strongly recommend using
the kit's decal sets as a mere "template" for making your own masks - i.e.
model of such scale certainly deserves "spraying up" most of its decals.
Weathering:
I weathered the model using my favorite method for "big planes". It is a
very simple technique, which I developed my 1/35 armor vehicles builds.
The procedure is basically as follows:
1) Model received a complete camouflage including decals and a protective
layer of synthetic glossy transparent enamel [I recommend Humbrol, Agama
colors need tens of hours for drying, and I don't use Revell at all, due
to its short durability],
2) After masking the transparent parts, I sprayed the entire model with a
matt or semi-matt synthetic enamel and left to dry for at least 48
hours,
3) When dry, I sanded the entire fuselage in water with a very fine
sandpaper, so as to distinguish the "glossy" and "matt" areas [see real
aircraft documentation],
4) After drying from the "bath", I filled several cans with different
tones of Humbrol synthetic grey and brown, then two cups with gloss and
matt black color - next to them I placed a can with a clear thinner
S6006,
5) Then looking at the photographs of the real aircraft I used a small
brush to apply color on areas that were "worn down", and with a big brush
dipped in thinner I tried to blur the transition places and soften the
weathering contrast (beware: You need to blow dry the thinner, otherwise
it will blotch the model),
6) The finished model received a coat of transparent enamel; I also gave
it another sanding in water and a polish with finishing compounds, where
needed.
Conclusion:
In my personal view, this kit doesn't stand a chance to become popular
among model builders, not mentioning the resurgence of interest in 1:24
scale aircraft models. I recommend this model only to the experienced and
patient builders, who are able to create many components out of nothing.
Not recommended for novice builders. Otherwise I cannot guarantee a better
result than what you can see on the attached photographs. At the same
time, I hope that this negative evaluation doesn't apply to the new 1:24
kits from Trumpeter.
|