|
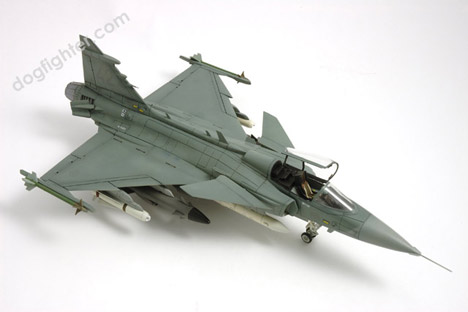
In this review, I would like to describe a construction of model JAS-39A
Gripen of the Swedish Air Force. The Italeri kit also offers a Czech Gripen
version, but the included decals lacked precision in their size and shape,
so I went for the Swedish aircraft. Besides, Czech Gripens fly only with
the attachment of two Sidewinders and external fuel tank, whereas the
Swedish aircrafts include much more attractive armament. Next you need to
choose between the original camouflage of Swedish Gripen with the
yellow-blue markings and the red tactical identification number, or the
new low-visibility camouflage. I chose the latter [low-vis].
Preconditions:
This article deals with the assembly of Italieri's Gripen 1:48 embellished
with the etched parts from Eduard. This set even includes colored etched
components for the interior. Next comes a mask set, again from Eduard. I
barely adjusted any of those pieces, only to the extent suggested by the
manual to the etched set.
I drew inspiration from a book: Gerard Keijsper - SAAB JAS-39 Gripen
fighter for the third millennium; publisher DEUS, ISBN 80-86215-12-1.
Kit:
As I stated above, I started off with a kit from Italeri. Right after
unpacking the box, I noticed that the sprues contained some flash and that
the panel lines on wings and fuselage were asymmetric. On the whole, the
kit is of medium quality, but if we want to expand our model collection by
the Gripen 1:48, we don't have another choice. As for today, no other
manufacturer has come out with an alternate JAS-39A.
Detailing:
In my build I used metal etched parts from Eduard designated for the
Italeri set. It was my first opportunity to work with colored etching, and
I must admit they significantly sped up the cockpit assembly and, what is
more, they really jazzed up the model. The ejection seat, for example, is
much nicer with colorful belts, or the instrument panel with printed dials
also looks more attractive. In particular, the side control panels with
indicated pushrods are quite elaborate; I could never achieve such quality
by painting them on my own.
Shape precision:
I didn't inspect the measurements in detail. It is not my custom to
painstakingly correct minor shape inaccuracies. The result, i.e. the
finished model, resembles the original aircraft, and that is all I need.
Equipment and weaponry:
With this kit there is an option to leave the radar cover opened and to
insert a simplified radar model. I didn't take this path for two reasons:
first, the plastic rendition of radar was very simplified and I didn't
have a photograph of the real radar for my readjustment; second, an opened
nose of the fuselage would spoil the otherwise elegant profile of this
aircraft.
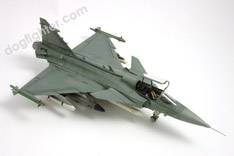
The kit offers a wide variety of detachable armament: external fuel tank
under fuselage, marking container, two Sidewinders, two Mavericks, and two
Swedish rockets Rbs 15. My intention was to create a Swedish Gripen model,
so I decided to employ all of the available equipment and weaponry.
Assembly:
The assembly of this kit is definitely not a breeze, but nothing too
terrible either; all in all, it is a task of medium difficulty.
The cockpit assembly with the addition of etched pieces is a simple job
without any obstacles. There is a small error in the manual for the etched
set: the electronics components behind the pilot's seat have reversed
numbers, namely No. 27 and 68. Special care is also needed when gluing in
the components No. 23 and 24, so that they don't collide with the front
windshield. That happened to me, unfortunately, and I had to laboriously
sand the etching to get the windshield in its proper place.
It certainly took lots of filler and strong nerves to fit the wing to the
fuselage, because the producer didn't do a good job there. I had to
restore panel lines on the bottom of the fuselage where it joined with the
wing. The gap between the components was so big that subsequent filling
and sanding totally covered the panel lining. Panel lines on the top of
the fuselage were indistinct in some places, so I rescribed them as
well.
Air brakes were another weak point of this kit. They were inconsistent
with the model and practically didn't fit on the fuselage.
The last complication was in the assembly of engine exhausts out of the
metal parts. Here, again, I had to be extra careful, but the result was a
great improvement over the kit's original version.
A cherry on top of my Gripen's assembly came in the form of tiny etched
parts representing sensors on the front fuselage - they really spiced up
the model [as did the canopy rear-view mirrors].
Model's coloring:
I used synthetic paints Agama, which I applied on the model by spraying.
The camouflage scheme is quite simple and is well illustrated in the
manual; there is no problem to it. As for the armament, I advise
following photographs rather than the manual, because Italeri just made
up the rocket colors. Luckily, I have a book by G. Keijsper, plus there
are many online photos, which can serve as a useful guide.
I used polishable pastes from Agama: exhaust stained metal on the exhaust
pipe and "steel" on the fuselage cannon barrel. I thinned these pastes
with the original thinner and sprayed them on, then polished them. I was
pleased with the result - the parts received an authentic metallic
look.
Position lights were painted with Agama's transparent enamel.
In my Gripen's construction I tested another innovation from Eduard -
covering masks cut in a yellow tape, not in a foil, as I was used to
before. At first, I was a bit worried about their application; later,
all my doubts quickly disappeared. The masks were very easy to
use.
Decals:
I used decals from the kit. They were very thick, but Agama's "miracle
solutions" [Adhesol and Hypersol] made them adhere quite smoothly to the
surface. My only criticism concerns the total absence of instruction
labels on the detachable armament. What a pity, since there are lots
of labels to be seen on the military photographs.
Weahering:
Before painting the camouflage I used a black color to spray panel lines,
i.e. "preshading", which is evident especially on the model's bottom
surfaces. It is almost invisible on the top surfaces due to the darker
camouflage color than on the bottom.
The model has a rather semi-matt finish due to the "low-vis" scheme. I am
not a big fan of striking weathering features, that's why I painted panel
lines only with a grey oil color.
Conclusion:
The Gripen's construction is of medium difficulty, but I can't recommend
etched parts to beginners - they make the build much more complicated
[with uncertain result] and much more expensive. However, I can recommend
etching to experienced modelers, as they make the result much more
attractive!
|